

A dislocated shoulder happens when your upper arm pops out of your shoulder socket.
To explain what happens here is a little bit about the anatomy of the shoulder-
Anatomy of the shoulder-
The shoulder is a ball and socket joint. Most of the shoulder movement occurs where the ball at the top of your humerus fits into the socket (glenoid), which is part of the shoulder blade (‘scapula’). The arm is normally held in the socket by the soft tissue which fits over the joint liked a sock. This is stabilised by the fibrous tissue of the capsule which surrounds the joint and by the muscles and tendons that rotate the arm.
Dislocation occurs when the ball is wrenched out of its socket. The force required to do this can also tear or partially tear the muscles, ligaments and/or shoulder capsule surrounding the joint.
Once the shoulder has been put back in to position the rehabilitation process begins. It is important for you to strengthen your shoulder fully and to be able to move it through a range of movements without experiencing pain.
The rehabilitation process can be split up into three phases
Phase 1
This phase starts after the shoulder has been put back into its socket. You will be put into a sling to keep your shoulder comfortable. It should be worn for a maximum of two weeks.
Pain can be a problem particularly in the first 2-3 weeks which you can control with basic painkillers, such as paracetamol. You can also use an ice pack on the painful area for 10-15 minutes.
You then need to start some gentle movements of the arm, out of the sling, to help reduce stiffness and relieve some of the pain. It is also important to maintain a good upright posture with your shoulders back and chest up, as this will prevent problems with shoulder muscle balance in the future.
It is very important during this stage that you avoid any positions that could cause re-dislocation. The most important position to avoid is holding your arm out at 90 degrees to your side with the palm facing upwards, especially if a force is being applied.
Phase 2
The main focus of this phase is to increase your range of movement and to increase your muscle strength, especially of your rotator cuff and to regain muscle balance in your shoulder.
The rotator cuff is an extremely important group of muscles that rotate the arm and form a cuff or sleeve around the shoulder joint and capsule. These must work together to keep the shoulder still and stable whilst moving the arm.
The scapula is supported by two important muscles, the trapezius muscle and the serratus anterior muscle. These muscles must be strong to control the shoulder blade as the shoulder joint moves.
Phase 3
The aim of this phase is to make progress towards functional and sporting activities, by helping you to regain the neuromuscular control of your shoulder. This is achieved by exercising the unstable shoulder in positions that challenge the shoulder muscles fully.
This also re-trains your proprioception, which is your body’s feedback system with receptors in the joint sending messages back to the brain. When these receptors detect a situation of potential tissue damage the brain will send a signal to the muscles to contract and protect the joint.
EXERCISES
General points
- Use painkillers and /or ice packs to reduce the pain before you exercise.
- It is normal for you to feel aching, discomfort or stretching when doing these exercises. However, if you experience intense and lasting pain e.g. more than 30 minutes then change the exercise by doing it less hard or less repetitions.
- Do short frequent sessions of 5-10 minutes up to 4 times a day
- Gradually increase the number of repetitions that you do.
Phase 1 Exercises
These exercises ease stiffness and pain in your shoulder, which will help your shoulder to recover. You will need to remove your sling to do these exercises.
1. Shoulder flexion
In sitting- Support your affected arm with your other hand under the elbow. Gently lean forward. Rock your arm backwards and forwards as far as your pain allows
2. Shoulder abduction
Sitting. Support your affected arm
with your other hand under the elbow. Gently lean forward. Rock your affected arm from side to side as far as your pain allows.
3. Shoulder lateral rotation
Sitting. Keep your elbow into your side and hold onto your affected arm’s wrist. Gently move your hand to 90 degrees to the body. Do not move further than this. Return to neutral.
Phase 2 Exercises
Static strengthening exercises
Static shoulder exercises work the muscles in the shoulder without moving the shoulder itself. For all these exercises, your elbow should be bent to a right angle and your arm should not move.
Repeat each one 10 times and hold for 5-10 seconds. Repeat 3 times daily.
Shoulder flexors- Stand facing the wall. Attempt to push your fist forwards into the wall.

Shoulder extensors
Stand with your back to the wall. Attempt to press your elbow backwards against the wall.
Shoulder abductors
Stand with the outside of your affected arm in contact with the wall. Attempt to move the whole arm out to the side, against the wall
Shoulder adductors
Stand with a small rolled up towel under your affected arm. Attempt to squeeze the whole arm to your side
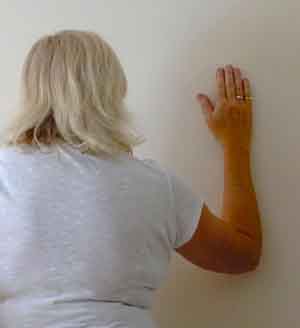
External rotators
Stand with the outside of your hand held against a wall or a jammed open door. Attempt to move the affected hand outwards. Do not allow your elbow to move away from your side
Internal rotators
Stand with the inside of the hand of your affected arm held against a wall or jammed open door. Attempt to move the affected hand inwards. Do not allow your elbow to move away from your side.
Mobility exercises
These exercises help you regain mobility in your shoulder. You will need a stick, brush, mop or long umbrella.
Repeat each exercise x 10 up to 4 x daily. Hold the movement for 5 seconds.
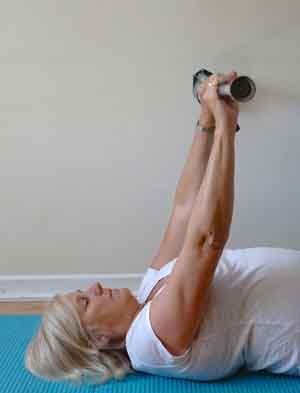
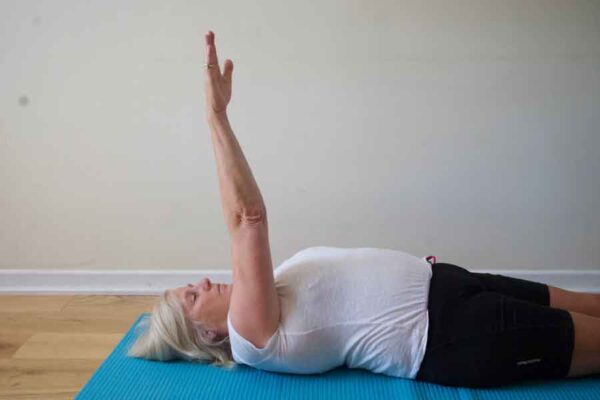
Shoulder flexion
Lift the stick up above your head. You can do this in lying, standing or sitting
Shoulder abduction
Standing holding the stick in both hands. Keeping your elbows as straight as possible, bring your arms out to the side and upwards towards your shoulder.
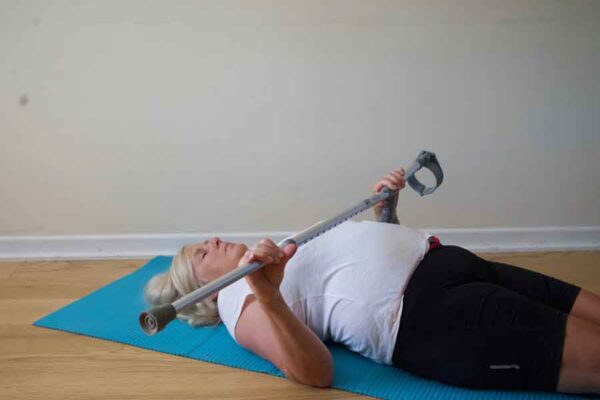
Shoulder external rotation
Standing or lying holding the stick with both hands with your elbows tucked against your body and at a right angle. Move the stick sideways thus pushing the arm to be exercised outwards
Scapula setting exercises
In order for your shoulder to return to normal movement, strength and function, it is important that the shoulder blade is aligned and supported sufficiently.
These exercises will help to stabilise the shoulder by working on the two main muscles, lower trapezius and serratus anterior.
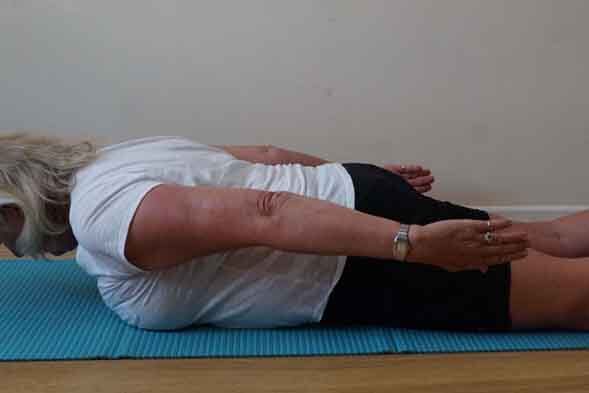
- Lower trapezius in prone lying
Lie on your stomach, with hands resting by your side and your forehead resting on a folded towel. Gently draw your shoulder blade backwards and down your back, working at 25% effort. Hold for 5-10 seconds. Gently lower back down.
- Lower trapezius in prone lying (progression)
In the same position as above, draw your shoulder blade backwards and down your back, working at 25% effort. Hold the shoulder blade in this position and lift and lower the arm about 2cm from the bed/floor. Repeat 5
Lower trapezius in standing
Stand facing a wall, with your forearm resting against it. Set your shoulder blade by drawing it backwards and down your back. Hold it in this position, whilst you walk your fingers up the wall and back down again
Serratus anterior in supine lying
Lie on your back with your shoulder
at 90 degrees to your body, with your elbow straight. Lift your arm vertically to bring your hand closer to the ceiling. Hold for 5-10 seconds. Gently lower down.
Then move onto Theraband exercises for the shoulder- see link here
Shoulder exercise with a Theraband
Finally move on to these other exercises
Serratus anterior in four-point kneeling
Kneel on your hands and knees, with your hands underneath the shoulders, knees underneath the hips. Push your chest and upper back upwards, pulling your shoulder blades backwards. Maintaining this position, lift your unaffected arm off the floor, without letting your shoulder dip downwards. Hold for 5-10 seconds then lower your hand back to the floor. You can progress this by lifting your arm up in front of you.
Push-ups against the wall
Stand facing the wall, approximately 2 feet away. Place both hands onto the wall and lean onto them, then lower yourself towards the wall as far as you are able and return. Repeat x 10 You can progress this by only using your affected arm to lower yourself towards the wall.
Push ups in four-point kneeling
Kneel on your hands and knees and walk your knees backwards so that your back and upper legs are in line. Keeping your head up and your back straight, lower yourself to the floor and return. Repeat 5-10 times.
FAQ
What are the chances of a re-dislocation injury?
As the shoulder is a very mobile joint held in place largely by ligaments and muscles, the chances of recurrence will depend on how well these structures heal. If you perform regular strengthening exercises, the structural support will be greatly increased, therefore increasing joint stability, and reducing the chance of re-injury.
The evidence shows that there is a high recurrence rate within the first two years of the initial injury. It is also suggested that recurrence rate is dependent on age. Younger people, especially males, are most likely to re-dislocate. This may be due to having a higher percentage of stretchy collagen or tissue in their joints and performing higher risk activities.
When can I drive?
This varies from patient to patient. Do not drive until you are safe to control the car in an emergency situation.
When can I participate in my leisure activities?
Your ability to start these activities will depend on your pain, range of movement and the strength that you have in your shoulder. You can usually return to most normal activities within 2 weeks, except for heavy lifting. Sports involving shoulder movements should not be played for six weeks to three months.
When can I return to work?
This will depend on the type of job that you have. You will probably be off work for 2-4 weeks. However, if you are involved in lifting, overhead activities or manual work then this may be longer.